Welcome to our special section “How to burn that” 🙂
Stop! Before hand, let me put you into perspective. You are in the right place, but helpless, hungry and you don’t know a heck of how to burn a single TV Box. Isn’t what happens to your right now right here right right right right?! So you gonna learn, TODAY!
What’s this about?
This guide will show you how to flash the majority of TV boxes that comes with an Amlogic S905X CPU processor :O
I will walk you throught hand in hand tightly, from having a non-working nice building brick [:(], to the most advanced TV box of Tanix world . Let’s move on! >>>> 🙂
Disclaimer! *-*

Cooking is always a dangerous stunt! Do this at home under the supervision of someone with total competence and a massive common sense brain!
I’m kidding you! You will do it all by yourself 😀
Hands-on!
Fiddling time! You are going to learn a pretty a nice cooking hack here. So, it’s time to get back to your kitchen and try out those redish baking gloves.

To begin with, if you are new to tanix world, you will need the “next generation” tools and ingredients to cook a nice crispy and savory version of your already outdated, wide thick TV box “breack”.
Get your ingredients within reach!
What are going to be the pieces of baking equipment and magic ingredients? As shown below, what you need now isssss
- Your favorite soft drink. No doubt! It’s the most important ingredient.
- The new firmware you want to install. You can get it clicking here.
- Your computer (wife’s or best friend one of yours) running on working Windows.
- Oven Burning tool. If you don’t have it, download it from here now!
- Some expandable flour.
- USB to USB cable. Here is a complete guide of how to get one for free.
- A kitchen timer.
- Your TX5 Pro Tanix TV box to burn.
- And an insurance for cooking liability.
Walk-through 4 simple steps
As you can see you only need 4 steps to get this done.
1. Installing the burning tool
Download, unzip (decompress) and install the burning tool. The installation process is very similar to any application you installed before. If you need a guide to know how to install it specifically. Please click here.
Subsequently, once the burning tool is ready for its use most probably, you will happen to see chinese characters. Look at the picutre below, as it’s shown, you must “glove” there to change to english.

2. Loading the firmware image
Hoping that you already downloaded your image, press there.
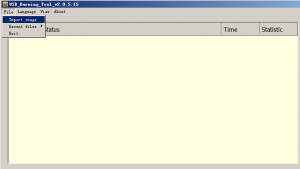
After clicking click on “Import image” option button effectively, you should see some “Open” window to find & choose the image file.

Search for the target image file to burn and Open!
3. Lauching!
The image file is loaded as I may assume. You should connect your box to your computer. Windows will need to detect the box. As you connect your tanix box to your computer, it should pop up a window (bottom right) to notify its drivers are ready. If windows can detect your box, hold on some few minutes and disconnect again.
Here is when things are getting interestingly wet.
Press START button! (to the right of the burning tool).
Take your USB cable, and plug one end to your PC.
Place your TV box close your computer where the USB can reach. You are going to use the USB port of the TV Box close to the SD card slot, just as shown in the picture. But wait!
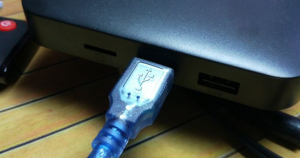
Put the box stading up on one side facing its top to you as you seen just above. Breath in, hold it back and … plug the power adapter cable and the USB cable end at the very same time!
If you did it succesfully you would hear several times a same sound, and see a blue bar increasing onto the right direction!

4. Waiting for the gong sound!

Like a kid with a new candy, you have been longing to have the new toy to work again. After the process is complete, you can go and take your Tanix back to real use and life.
Just unhook the power and USB cable, and hook up its required beloved HDMI cable, and outlet power cord back for taking a new ride into your new featured TX5 Pro firmware! 😀
Congrats!!
If you have any problem, issues or suggestions, leave a comment just below!
BEST PRODUCTS
ZENSTREAMS by Inivech®
Wireless Bluetooth Earbuds
200 Hours Battery

aa
http://freaktab.com/forum/tv-player-support/amlogic-based-tv-players/s905x/662654-tanix-tx3-mini-amlogic-s905w-new-soc-android-7-1-1?p=691375#post691375
Test this BETA by TF Card or USB Memory
We would need to add an extra port to feature micro USB and probably a hub on the motherboard. Just for this function…
In fact, it is possible to flash by TF Card, I think we will write a manual soon.
I just got an email today for a new F/W for the TX3 Mini but this talks about TX5 pro. So what the heck?
Just ensure you download the correct version for your device, this case TX3 Mini. You can follow “download button” from the email.
I guess you are talking about the flashing guide. Process is same for both devices, so you can follow this guide to flash almost every Amlogic based box.
This process is usually the same for all tv box.